Making a Cheap Macro Lens
Macro photography is close-up photography. The lens is typically optimized to focus sharply on a small area and magnifying...

Making a cheap Bounce Card
Yet again some cool diy to bounce light from a DSLR flash! As everyone knows, it's actually better not to flash light...


Visualizzazione post con etichetta Tutorial. Mostra tutti i post
Visualizzazione post con etichetta Tutorial. Mostra tutti i post
I've been asked several times how to add a simple frame around a picture to let it have a postcard mood.
Actually its really simple and fast.
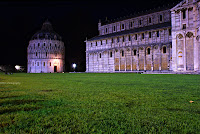
1) Open Photoshop and your "postcard" suited picture. I choosed that one taken by me in Piazza dei Miracoli in Pisa, Italy:
2) Go to Image -> Canvas Size or just press Ctrl+Alt+C and a new window will appear:
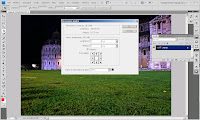
3) Insert Height and Width values as you prefer (usually same values for both and in pixel, they depends on the resolution of the picture you're framing) and on the bottom right you can choose the color by clicking on the little square.
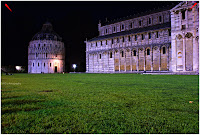
Actually this will add a line around all of your picture by the values you inserted and the color you choosed. My values are H:1 W:1 Color:White
4) Let's re-do the second and third step; Go to Image -> Canvas Size or just press Ctrl+Alt+C and the canvas window will appear.
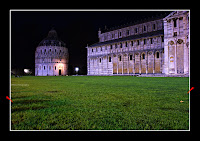
This time my values are H:15 W:15 Color:Black
As you can see, that step will add you a bigger line than the one before (this time we used H:15 W:15) that will be our frame around the picture giving to it a postcard mood!
Hope you liked. As usual, please share.
[More]
Actually its really simple and fast.
1) Open Photoshop and your "postcard" suited picture. I choosed that one taken by me in Piazza dei Miracoli in Pisa, Italy:

2) Go to Image -> Canvas Size or just press Ctrl+Alt+C and a new window will appear:

3) Insert Height and Width values as you prefer (usually same values for both and in pixel, they depends on the resolution of the picture you're framing) and on the bottom right you can choose the color by clicking on the little square.
Actually this will add a line around all of your picture by the values you inserted and the color you choosed. My values are H:1 W:1 Color:White

4) Let's re-do the second and third step; Go to Image -> Canvas Size or just press Ctrl+Alt+C and the canvas window will appear.
This time my values are H:15 W:15 Color:Black
As you can see, that step will add you a bigger line than the one before (this time we used H:15 W:15) that will be our frame around the picture giving to it a postcard mood!

Hope you liked. As usual, please share.
Hi everybody!
This time i will explain how to build a free and easy Flash Diffuser.
As everyone knows, flashing directly to the subject will cause it to be "whitened" and so, we will have a great loss in details.
That's why we need to bounce the flash light on a reflective surface (white if possible) as discussed in my previous post "Making a cheap Bounce Card"
Actually you stop here and can go buy a Flash Diffuser from eBay or photography shops, or you can read furthemore!
This time i will explain how to build a free and easy Flash Diffuser.
As everyone knows, flashing directly to the subject will cause it to be "whitened" and so, we will have a great loss in details.
That's why we need to bounce the flash light on a reflective surface (white if possible) as discussed in my previous post "Making a cheap Bounce Card"
Actually you stop here and can go buy a Flash Diffuser from eBay or photography shops, or you can read furthemore!
Flash Diffuser for External Flash Unit
Ingredients:
- an opaque can of Liquid Soap/Detergent
- a can of Pringles
Ingredients:
- an opaque can of Liquid Soap/Detergent
- a can of Pringles

1) Cut the Pringles can, eating them meanwhile, in a 5cm to 10cm small piece and insert white paper inside the border of it (pringles inside can have gray reflective surface)
2) Cut the bottom of the liquid soap/detergent can so that some cm of the closed bottom will actually go out from the pringles can in the final flash diffuser.
2) Cut the bottom of the liquid soap/detergent can so that some cm of the closed bottom will actually go out from the pringles can in the final flash diffuser.

3) Put it together with some black tape if the diameter doesen't fit perfectly (mine fitted perfectly)


4) That's all! Here you can see the result in taking picture flashing directily to the subject without and with the Flash Diffuser we just made. While without the Flash Diffuser you can see that the subject (pringles can) is overexposed by flash light, with the Flash Diffuser ON, there is no overxposed subject, and details are bettere than without it.


Actually the pringles can should fit almost every external flash unit!
Flash Diffuser for Internal Flash Unit (DSLR)
Ingredients:
- an empty white opaque film can
Just cut a little stripe of the film can just to let your internal flash fit inside it.
Here how it should look like and how it will fit the internal flash unit of your dslr


Those are the one i made:

As everytime, if you liked it, please share it!
Ingredients:
- an empty white opaque film can
Just cut a little stripe of the film can just to let your internal flash fit inside it.
Here how it should look like and how it will fit the internal flash unit of your dslr


As everytime, if you liked it, please share it!
First of all, what is an Holga camera!
Well,if you are reading how to create an Holga effect, you probably know it. But i will do some wiki and explain.
Well,if you are reading how to create an Holga effect, you probably know it. But i will do some wiki and explain.
The Holga is an inexpensive, medium format 120 film toy camera, made in China, appreciated for its low-fidelity aesthetic.
The Holga's cheap construction and simple meniscus lens often yields pictures that display vignetting, blur, light leaks, and other distortions. The camera's quality problems have become a virtue among some photographers, with Holga photos winning awards and competitions in art and news photography.
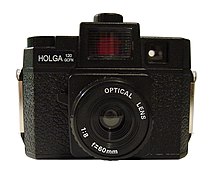
from Wikipedia
So the main features are:
- Vignette
- Vintage/Acid color
- Good Contrast in the center of the picture
- Blur on the edge of the picture
some picture taken with the holga can be viewed here on Flickr
You can buy a cheap Holga on Ebay
Here we go with our Photoshop Tutorial
1) First of all, let's open an image we like. That's mine, a shot taken in Asakusa
So the main features are:
- Vignette
- Vintage/Acid color
- Good Contrast in the center of the picture
- Blur on the edge of the picture
some picture taken with the holga can be viewed here on Flickr
You can buy a cheap Holga on Ebay
Here we go with our Photoshop Tutorial
1) First of all, let's open an image we like. That's mine, a shot taken in Asakusa

2) We are now going to create a vignette. Go to Filter -> Distort -> Lens Correction and create the vignette by giving -100 in Amount under Vignette and choose Midpoint by the one that fit best your tastes.
I did Amount=-100 and Midpoint=+80 and here is the result:

I did Amount=-100 and Midpoint=+80 and here is the result:

3) Now we are going to recreate some Acid/Vintage color by going on Layers and adding a new Curves Layer by pressing this button:


4) To let the colors look like Acidified and Vintage we have to draw an S in the curve layers it just appeared like that:


Press CTRL+SHIFT+E to merge layers.
5) OPTIONAL This step will saturate colors a bit but it could omitted. If you want to do so you can go Image-> Adjustments -> Tone/Saturation and add saturation. I did Saturation=+20


6) Let's add some contrast by giving an unsharp mask to the luminosity channel of the picture.
First we have to go to Image-> Mode -> Lab Color and then in the Layer|Channel|Trace we click on Channel as that:

First we have to go to Image-> Mode -> Lab Color and then in the Layer|Channel|Trace we click on Channel as that:

Click on Luminosity and the picture will be displayed in Greyscale
7) Then add the unsharp mask to the Luminosity channel by clicking on Filter -> Sharpen -> Unsharp Mask and add values as 20|20|0 (you just have to move the first two option as you prefer). I did 20|20|0 and that's it:

8) Let's go back to RGB color by clicking on Image-> Mode -> RGB and we are almost done:

9) OPTIONAL, we can add a 10% to 20% transparent Black layer over the picture to obtain a more flat image:

10) That's the final result i had in a few minutes!

We can even add some Blur on the edge by using the same way explained in my Tilt-Shift Tutorial
Hope you enjoied it, and if so, SHARE it!!

8) Let's go back to RGB color by clicking on Image-> Mode -> RGB and we are almost done:

9) OPTIONAL, we can add a 10% to 20% transparent Black layer over the picture to obtain a more flat image:

10) That's the final result i had in a few minutes!

We can even add some Blur on the edge by using the same way explained in my Tilt-Shift Tutorial
Hope you enjoied it, and if so, SHARE it!!
"Tilt-shift photography" refers to the use of camera movements on small- and medium-format cameras, and sometimes specifically refers to the use of tilt for selective focus, often for simulating a miniature scene.
So, actually there are some cool website to do that like http://tiltshiftmaker.com/ or http://labs.artandmobile.com/tiltshift/ and you can have last one for your iPhone too!
But we want to make things difficult (not that much anyway ;p) and make it from scratch!
1) Open you Photoshop or Gimp application
2) Choose and open a photo you think it will fit for miniaturizing itself. I choosed my shot from Umeda Sky Building, Osaka (Japan). Actually really old shot and not in a high resolution.

3) Create a Layer Mask, or simply we can use quick mask just pressing Q, so we don't need to create any mask layer.
4) Now,we are going to select which part of the picture will be blurred. To have a smooth effect for the blur, we can choose the gradient tool (pressing G) and then click on the fourth icon along before the Mode drop-down (see picture for details)
4) Now,we are going to select which part of the picture will be blurred. To have a smooth effect for the blur, we can choose the gradient tool (pressing G) and then click on the fourth icon along before the Mode drop-down (see picture for details)

5) With the gradient tool on, we draw a vertical line starting from the center of what we want to remain in focus and as long as how much in focus we want. And it will be painted in red (actually it just a mask, so we didn't paint anything!)

6) Let's exit from Quick Mask view by pressing Q again and we can see that the red painting has disappeared in favour of a selection.

7) We need to blur that selection. Let's choose Lens Filter from Filter->Blur->Lens Filter and you can freely play with the setting. I advice you to take Radius=from 20 and 60, Blade Curvature=0, Rotation=0, Brightness=from 10 to 35, Threshold=254, Amount=0.
I used 50, 0, 0, 35, 254, 0 and here is the result:
I used 50, 0, 0, 35, 254, 0 and here is the result:

8) Deselect by pressing CTRL+D or simply clicking on the picture with Selection Tool ON.
9) Let's try to have a more Plastic look by saturate colors by going Image -> Adjustments -> Hue/Saturation and boost the Edit:Master Saturation=from +20 to +50, i did +50
9) Let's try to have a more Plastic look by saturate colors by going Image -> Adjustments -> Hue/Saturation and boost the Edit:Master Saturation=from +20 to +50, i did +50

10) Give a bit more contrast with an Unsharp Mask or by going on Image -> Adjustments -> Curves and have a half S curve like that:

Here is my result, its an old 2mpx picture, so the more details you have, the better the result will be.

If you enjoied it, please share it!^^