Making a Cheap Macro Lens
Macro photography is close-up photography. The lens is typically optimized to focus sharply on a small area and magnifying...

Making a cheap Bounce Card
Yet again some cool diy to bounce light from a DSLR flash! As everyone knows, it's actually better not to flash light...


What is a Ring Flash?
Ring flash is a circular photographic flash that fits around the lens, especially for use in macro (or close-up) photography. Its most important characteristic is providing even illumination with few shadows visible in the photograph, as the origin of the light is very close to (and surrounds) the optical axis of the lens. When the subject is very close to the camera, as is the case in macro photography, the distance of the flash from the optical axis becomes significant. For objects close to the camera, the size of the ring flash is significant and so the light encounters the subject from many angles in the same way that it does with a conventional flash with soft box. This has the effect of further softening any shadows.
Ring flashes are also very popular in portrait and fashion photography. In addition to softening shadows, the unique way that a ring flash renders light gives the model a shadowy halo which is a common feature of fashion photography...as Wikipedia says...

This is actually what you'll get:
Click here for Examples
As i previously said, i've never used one, but i'm planning to, so i found some useful link on how to do-it-yourself!
All the credits go to the authors.
1) The Strobist.com flickr group full of DIY ring flash and lighting DIY
2) DIY ring flash from swilton
3) Really cheap and simple DIY ring flash from antontrax
4) Super cheap DIY ring flash from jedrek
5) Ring flash for built-in flash
6) Christmas Light Ring Flash by Tom Edge Photography
7) D.I.Y. ring flash from latente (in italian)
8) Finally a really well done blogspot about strobist infos
In photography, a multiple exposure is when two or more individual exposures are made to create a single photograph.
This is an example of what i did with an Holga camera, which let you shot multiple expoure on the same piece of film!

To do the job, the shutter release of the camera should be independent from the winding mechanism of the film (if we are talking about film cameras) but we can have multiple shots using our imagination and create some cool and dreamlike works.
Basically there are four way of doing that, or at least those are the one i thought on:
1) Buy an expensive Pro DSLR and probably it will let you shot some few times on the same picture.
2) Buy a cheap Holga from eBay
3) Use a software photo editor such as Adobe Photoshop or GIMP, by altering the opacity of the two images and line them up over each other, or set the layers to multiply mode, which 'adds' the colors together rather than making the colors of either image pale and translucent
4) DSLR with an external flash unit
DSLR with an external flash unit
As the title says, we need a dslr unit with a lens (obviously) and an external flash unit for it.
Actually the trick to have multiple exposure is to:
- have a long shutter speed (you need to try it for your best fit, as every environment will require a different long shutter speed)
- use an external flash unit which let you shot the flash by pushing a button
How to:
Target the subject of your picture, shot it with the flash on (as a normal shot with flash), and then move quickly (it depends on how long is the shutter speed you are using) on another subject and just press the button of your flash unit to flash for a second time.
We will get a double exposure picture, because the automatic flash on the first shot, freezed the first subject, then the manual flash will freeze a second subject.
Actually you can have multiple exposure even with a single flashing light if the subject is in good light condition.
That's what i did


The main thing to diffuse light on every flash, is to try to filter it before the lights go to the subject!
Actually on DSLR flash external unit (which you can move in certain degree of movement) you can diffuse light by bouncing it on a white surface or you can diffuse it through opaque surface as discussed previously here.
On compact camera flash, we can do the same things to diffuse lights. Perhaps flash in those cameras are really tiny and we can't use the same way we used for DSLR.
So, here some tips on what you can use to diffuse light from it.
(example on how to do it, are done on my mobile camera, because i have no compact camera at the moment, but they have been tested and they work properly)
- Rolling Paper taped directly over the flash unit (and only the flash unit, pay attention not to put the opaque surface choosen on the lens camera too!). You can test using 1 or more sheet of it until you go to a good compromise between light available and shadow smoothing.


Other examples:
- Toilet Paper
- Opaque Plastic from detergent/liquid soap
- Simple white paper
So, in the end, any white opaque surface attached directly over the flash unit trying to avoid light leaks (just by taping all over its edges), will do the job.
Enjoy it.
This time i will explain how to build a free and easy Flash Diffuser.
As everyone knows, flashing directly to the subject will cause it to be "whitened" and so, we will have a great loss in details.
That's why we need to bounce the flash light on a reflective surface (white if possible) as discussed in my previous post "Making a cheap Bounce Card"
Actually you stop here and can go buy a Flash Diffuser from eBay or photography shops, or you can read furthemore!
Ingredients:
- an opaque can of Liquid Soap/Detergent
- a can of Pringles

2) Cut the bottom of the liquid soap/detergent can so that some cm of the closed bottom will actually go out from the pringles can in the final flash diffuser.


Actually the pringles can should fit almost every external flash unit!
Ingredients:
- an empty white opaque film can
Just cut a little stripe of the film can just to let your internal flash fit inside it.
Here how it should look like and how it will fit the internal flash unit of your dslr


As everytime, if you liked it, please share it!
Macro photography is close-up photography. The lens is typically optimized to focus sharply on a small area and magnifying it.
Depth of field is extremely small when focusing on close objects; a small aperture (high f-number) is often required to ensure sufficient depth of field. This requires either a slow shutter speed or bright lighting for correct exposure; in all but the brightest natural lighting if a prolonged exposure is not advisable, auxiliary lighting (such as from a flash unit) is required as a ring flash or a flash diffuser like the one discussed here on DIY photography.
How to:
- Using a lens specifically designed for close work and with a long barrel for close focusing, called a macro lens.
- Extending the distance between the lens and the film or sensor by inserting either extension tubes
- Placing an auxiliary close-up lens in front of the camera's taking lens. Inexpensive screw-in or slip-on attachments provide close focusing at very low cost
- Reversing the lens using a "reversing ring"
You can buy a reverse ring, or you can fit your second lens (if you have one) on the lens you have on your body camera as i did and have macro capabilities for FREE:

That’s my sony a300 with the standard lens dt18-70 and my old manual Zenit lens: Mc Helios 44m-7

I just reversed the Helios lens and attached to the DT lens

That’s all!
Don’t forget to switch to Manual focus!
This is an example of what i did with that DIY:

Other infos:
- Here is another cheap way to have an homemade macro lens at Photocritic
- And here another usueful way to build your own reversing ring from a Body Cap, its basically the same way i did macro reversing, but instead of using 2 lens, you will use a body cap, a filter and some glue!
- Another really cheap way of doing macro from Zuco
In that link you will find schematic of the camera connection so to quickly make a release cord which really cost if you want to buy it in a store!
Check out:
- Minolta
- Sony
- Canon or here or here or for N3connector
- Nikon or here
Or a general PDF on how to make your own trigger or here
Basically you have to shortcircuit some pins on the camera.
You can do that by using a simple 2way switch.
Here is the pin schematics on the Sony Alpha Series


It has 3 little cables, one red (1), one white (2) and one without rubber around it (3)


Whenever i push the button, my camera shoots!
If you liked my How-to, please Share!
Here we go with another cool diy project: a cheap Macro Flash!
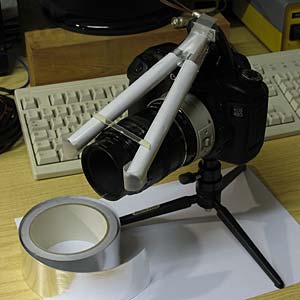
There are a couple of way to do really close up photography:
- Buy a Macro Lens (which cost! and well, if you don't want to spend money...well...skip that!)
- Placing an auxiliary close-up lens in front of the camera's taking lens (they doesen't cost too much)
- Reverting your lens using a reversing ring (yep that's the chepest way!) You need to buy a reverse ring for your camera and lens, so you can attach your lens in the other way you normal will attach it to the body of the camera!
- Reverting your lens by taping it in reverse on another lens already attached to your body camera (you just need to have 2 lens and some tape! That's the CHEAPEST way)
The problem of sufficiently and evenly lighting the subject can be difficult to overcome. Some cameras can focus on subjects so close that they touch the front of the lens. It is impossible to place a light between the camera and a subject that close, making extreme close-up photography impractical.
Ring flashes, with flash tubes arranged in a circle around the front of the lens, can be helpful in lighting at close distances. Ring lights have emerged, using white LEDs to provide a continuous light source for macrophotography.
Homemade flash diffusers made out of white Styrofoam or plastic attached to a camera's built-in flash can also yield surprisingly good results by diffusing and softening the light, eliminating specular reflections and providing more even lighting.
So, here you will Find some useful information on using your flash light on your macro shots!!
Yet again some cool diy to bounce light from a DSLR flash!
As everyone knows, it's actually better not to flash light directly on the subject because it will be really overexposed and there will be a couple of not-so-good shadow behind his shape!So, the trick is to let the light diffuse (letting it through some opaque filter, it can be even the toilet paper^^) or to bounce on a "white" (or so) surface!
This nice link will help you build quickly a really cheap bounce card to (yeah) bounce the light so that (ONLY) in the case you need to use your flash, you can get sharp photos!
Just click over there!
Hi all!
I am a freelance photographer from italy!
Actually i never wrote any blogs…maybe because i was (and i am) too lazy to write one…but i just had the need to write it, to get all the experience on DIY photography in a single web site: how to build up stuff for Photography, without paying with your flesh!!
Every credit to the original author will be given in that site.
Without them, we won't have such useful DIYs!
So, i’ll post DIY photography and design links, and maybe some news bout tech…who knows?
So, stay connected!