Making a Cheap Macro Lens
Macro photography is close-up photography. The lens is typically optimized to focus sharply on a small area and magnifying...

Making a cheap Bounce Card
Yet again some cool diy to bounce light from a DSLR flash! As everyone knows, it's actually better not to flash light...


In photography, a multiple exposure is when two or more individual exposures are made to create a single photograph.
This is an example of what i did with an Holga camera, which let you shot multiple expoure on the same piece of film!

To do the job, the shutter release of the camera should be independent from the winding mechanism of the film (if we are talking about film cameras) but we can have multiple shots using our imagination and create some cool and dreamlike works.
Basically there are four way of doing that, or at least those are the one i thought on:
1) Buy an expensive Pro DSLR and probably it will let you shot some few times on the same picture.
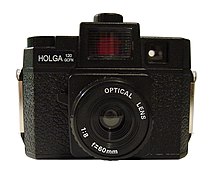
2) Buy a cheap Holga from eBay
3) Use a software photo editor such as Adobe Photoshop or GIMP, by altering the opacity of the two images and line them up over each other, or set the layers to multiply mode, which 'adds' the colors together rather than making the colors of either image pale and translucent
4) DSLR with an external flash unit
DSLR with an external flash unit
As the title says, we need a dslr unit with a lens (obviously) and an external flash unit for it.
Actually the trick to have multiple exposure is to:
- have a long shutter speed (you need to try it for your best fit, as every environment will require a different long shutter speed)
- use an external flash unit which let you shot the flash by pushing a button
How to:
Target the subject of your picture, shot it with the flash on (as a normal shot with flash), and then move quickly (it depends on how long is the shutter speed you are using) on another subject and just press the button of your flash unit to flash for a second time.
We will get a double exposure picture, because the automatic flash on the first shot, freezed the first subject, then the manual flash will freeze a second subject.
Actually you can have multiple exposure even with a single flashing light if the subject is in good light condition.
That's what i did


Well,if you are reading how to create an Holga effect, you probably know it. But i will do some wiki and explain.
The Holga is an inexpensive, medium format 120 film toy camera, made in China, appreciated for its low-fidelity aesthetic.
So the main features are:
- Vignette
- Vintage/Acid color
- Good Contrast in the center of the picture
- Blur on the edge of the picture
some picture taken with the holga can be viewed here on Flickr
You can buy a cheap Holga on Ebay
Here we go with our Photoshop Tutorial
1) First of all, let's open an image we like. That's mine, a shot taken in Asakusa

I did Amount=-100 and Midpoint=+80 and here is the result:


First we have to go to Image-> Mode -> Lab Color and then in the Layer|Channel|Trace we click on Channel as that:


8) Let's go back to RGB color by clicking on Image-> Mode -> RGB and we are almost done:

9) OPTIONAL, we can add a 10% to 20% transparent Black layer over the picture to obtain a more flat image:

10) That's the final result i had in a few minutes!

We can even add some Blur on the edge by using the same way explained in my Tilt-Shift Tutorial
Hope you enjoied it, and if so, SHARE it!!